Crimped primers come from the military side of things – it helps to hold the primer in when headspace is deliberately loose or just got that way. Military ammo can get a rough ride and anything to hold it together – from crimps to tar bullet seals – helps.
But you find it in civvy ammo too – “NT” ammo, and just ammo.
The old primers push out, maybe reluctantly, then the new ones don’t want to go in. So you have to get the crimp out. But how? What’s the Best way?
(PS: does your workplace block this page? This may help you get past corporate firewalls.)
Here are the ways I know of. Where you see “ihui”, it means “I Have Used It” – all else is gleaned from the web and talking to / observing fellow reloaders.
Reaming
Reaming – cutting metal away – has the slight disadvantage that the primer pocket itself – particularly with a strong ring crimp – may be distorted. Reaming out only the crimp ring will leave the pockets still distorted / undersized and somewhat difficult to put a primer in – but they will go in.
Reaming is also messy due to shavings and relatively slow compared to other methods, and may leave an imperfect entry zone for the primer (tool chatter, maybe a flat cut instead of a radius, and so on) or be cut off-centre (some tools, not all).
I have found reaming to be unsatisfactory on a progressive, where the primer / case alignment can be less than perfect, making the entry zone important.
- scraping with a pen knife – ihui
- slow and clumsy, but it works if you have only a few to do. If you rush, the cuts are rough.
- cutting with a chucked deburring tool- ihui
- cutting with a Hornady Primer Pocket Reamer- ihui
- The “Best” of the common cutting methods – because it’s cheap, effective, fast, and has a depth-stop. Having said that, it still cuts a flat instead of a rounded entry area, which is less than ideal for slipping the primer in. Sloppy use of the cutter – working at an angle – will destroy the brass. I’ve found it best to use by hand.
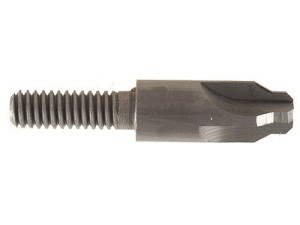
- The “Best” of the common cutting methods – because it’s cheap, effective, fast, and has a depth-stop. Having said that, it still cuts a flat instead of a rounded entry area, which is less than ideal for slipping the primer in. Sloppy use of the cutter – working at an angle – will destroy the brass. I’ve found it best to use by hand.
- Cutting with the Wilson Primer Pocket Reamer
- The high-end of cutters, like everything else Wilson makes this is a precision tool, and you must use the Wilson trimming system to make this work. This isn’t ihui, but I do use the Wilson trimming system (my pick for precision trimming). This cuts the less-desired flat entry area, but will uniform severely distorted pocket sides.
- Looks like this:

- In the Wilson tool:

Swaging
Swaging re-forms the entire pocket and produces the easiest-to-insert primer experience – all of the listed swagers create the desired rounded entry area. The downside is some setup time: each brand of brass is slightly different dimensionally, and the tooling should be setup for a given brand for best results. Mixed brass can stop the process, bend something, or just result in a less-than-perfect removal.
- CH4D Primer Pocket Crimp Swager Tool – ihui
- The “Best” of the swaging tools – it is the least expensive swaging method that I know of, and the fastest – this tool works with any standard reloading press with a ram and 7/8×14 threads (it will also work in the Forster Co-Ax with its shell holder adaptor plate). It holds the case by the rim in your own shell holder – some have reported tearing rims (certainly due to setup issues) but I find it works well, having swaged both commercial and military cases. My example is a little rough in the non-critical areas (such as the body threads), but smooth enough where it counts – the swaging punch. For the price, I’m not going to complain about imperfect finish when the fit is fine.
- Here’s why it’s fast: slip the case in, move the press handle a few inches until the ram tops out, pull the handle back a bit, slip the case out and do it again. Minimal handle movement, and everyone is well-practised at moving cases in and out of shell holders.
- RCBS Primer Pocket Swager Combo – ihui
- This tool works with any standard reloading press with a 1″ or smaller ram and 7/8×14 threads. It pushes the case over a rod, which stops the case while the swager nipple continues up to do its job. There’s a cup that sits over the ram, called the “case stripper”, pushing the finished case off of the swager on the ram downstroke. Without using the cup you can still wiggle the case off of the swager, but even with a touch of lube on the swager every few cases this is fussy and slow. With the cup, cases pop off easily with the right motion. Setup is important on this swager: too tight and the rod bends (RCBS will replace it, but then you wait). I find this system a bit awkward – getting the case over the rod with the rod being invisible inside of the die is fiddle work. Might be easier if you swage before sizing, so that the neck dimension is more generous.
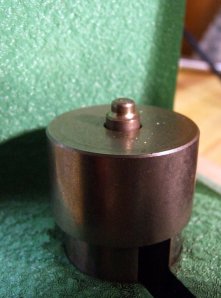
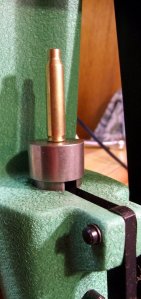


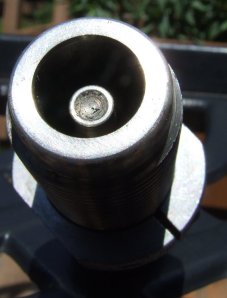


- Dillon Super Swage 600 – ihui
- The crème de la crème of off-press crimp removal, this standalone tool is fast (maybe twice as fast as the RCBS), works well, and takes up little space. It is expensive, but bulk reloaders swear by it. Setup is less critical as you have less leverage than the RCBS system. Pop the brass over the rod, slip down, work the handle, flip and, remove brass, then rinse and repeat. The rod is pointed, which has pros and cons: easier to slip the brass over, but pushes directly on the flash hole instead of bridging it as in the RCBS system (which has a concave end) – one could imagine burrs being pressed across the flash hole, and the concave RCBS rod supports the head on the thickest part of the case.

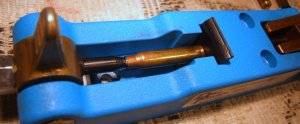
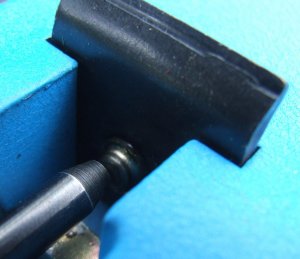
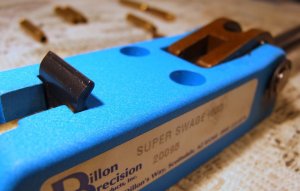
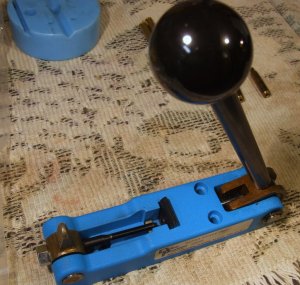
-
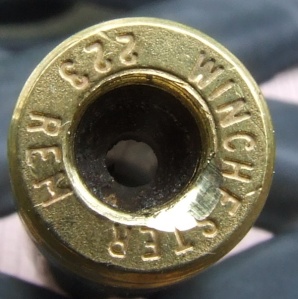
Make sure your brass is lined-up properly before cranking the handle:
- Dillon 1050 Super progressive press – ihui
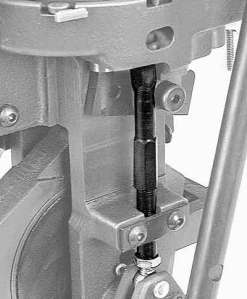
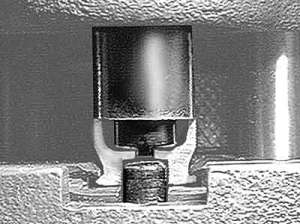
- On-press crimp removal – the fastest possible method. Since every pocket is uniformed as the brass travels around the press, you never again worry about a crimped pocket getting mixed in and causing a stoppage. If your only problem is removing pocket crimps this is an overkill solution – but if you were considering this near-industrial press anyway, it’s a great benefit. I have never owned one, but have used one – smooth and powerful. Setup matters, because the brass is positioned against an inserted rod as with the RCBS system.
There you have it – there are many ways to skin this cat, so pick the one that works for you.




2012-05-18 at 15:21
Excellent and informative – thanks for taking so much time and effort to do it
2012-08-20 at 11:03
Thanks Keith. Always good to get some feedback – I find that taking the time, once, saves time in re-explaining repeatedly.
2012-09-15 at 09:33
Awesome article! Great photos and explanations!
2012-10-12 at 21:09
First class reporting. Great job and very helpful. Thank you.
2013-01-15 at 19:47
Thank you very much for the reviews,as a new reloader im putting together the best equipment i can afford,the dillion seems to me to be the best for fast ,reliable crimp removal,costs more but ithink in the long run it will be my choice.Thanks agian big help to newbie,mike
2013-02-22 at 23:01
Thanks, this is the best explanation I have found. Nice pics, easy to see what your looking for.
2013-02-26 at 12:21
What does ihui mean?
2013-02-26 at 12:33
Hi Rich. As noted in the article, ‘Where you see “ihui”, it means “I Have Used It” ‘
2013-02-27 at 21:22
Thanks, I must learn to read more carefully.
2013-03-03 at 22:20
Great Job! Period!
2013-04-09 at 01:31
Beautiful job on this. Thanks….
2013-04-24 at 09:43
Well done comparison ! Very educational. Thank you!
2013-05-13 at 07:11
A buddy was trying to explain this process by email. I was asking how to reload .223 and just not getting it. A well thought-out and informative explanation! Bookmarking now. Thank you.
2013-05-16 at 14:29
Always great to hear some positive feedback!
2013-05-16 at 14:46
1. How are primer pocket crimps formed? 2. What does the tool that forms them look like? 3. How does said crimping tool work? 4. How many different variations of crimping styles are there ( three stake, four stake, circle, epoxy; Is that all?) 5. What happens to all that brass that gets crimped after it’s been reloaded four times?
2013-05-16 at 17:35
Hi Seth. Regarding 1-3, http://lmgtfy.com/?q=making+cartridge+cases . Regarding 4, I don’t know; regarding 5 – cases can be reloaded a few times or many – and are then recycled.
2013-10-28 at 08:34
Yes, dumb question, but what doe “ihui” mean? “imho” means “in my humble opinion,” but “ihui” does not show up in google.
2013-10-28 at 08:42
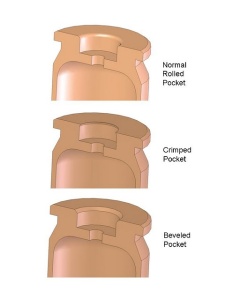
Don, thanks for writing. From the post (just under the picture of three types of pocket), ” Where you see “ihui”, it means “I Have Used It” – all else is gleaned from the web and talking to / observing fellow reloaders.”
2013-11-20 at 16:10
Great article. This is exactly the information I have been trying to find on reaming pockets. Since I am just starting to reload and buying used brass at my local gun shop, the comparison pictures of the different shell casings helps a lot. Thanks for taking the time to do this.
2013-11-21 at 10:41
Wonderful. But what is “ihui?”
2014-01-03 at 21:17
Great article. Echo your comments on the RCBS setup’s sensitivity to brass types/variations. I was swaging brass for a friend of mine and unbeknownst to me he had IMI brass mixed in with Lake City. Swager was set for Lake City, rod in swager bent at the first IMI case I hit. Grrrrr…… I’m buying the Dillon tool.
2014-03-02 at 04:37
Excellent research and presentation. I found it because I sized my crimped 5.56 before using my RCBS swaging combo. Big mistake. The neck is now too small for the swaging rod. Won’t do that again. Tried belling the case but that didn’ t work. Was trimming the brass with a Dillon case trimmer which also sizes as it trims. Thanks!
2014-03-02 at 09:54
PS the pic regarding “cutting with a chucked deburring tool” saves me from waiting to buy another decrimping tool. Now I know what that little rod sticking out the end is for…often wondered about it… Again, thank you!
2015-08-24 at 01:18
I bought 500 rounds of brass that had already been deprimed. I tried to use the Rcbs combo but the rod wouldn’t fit in the neck. Sounds like it might have already been sized.
2015-08-30 at 21:59
Most likely – if you can find a way to expand the neck, you’ll be fine.
2022-02-09 at 08:42
I dont use a universal decapling die. I decap when I size, then I stage if needed. Ive used the RCBS decapping die for over a decade and never had an issue with the rod not fitting.
2022-02-09 at 08:44
Apparently my phone decided that I didn’t need to say what I intended to say. I swage if needed with the RCBS swaging die that I’ve used over a decade.
2014-09-12 at 19:47
Can I do this with my case trimmer?
2014-09-12 at 22:15
Hi Lindsey. Depends on your trimmer – some have attachments / options for removing crimps (like the Wilson).
2014-10-04 at 02:47
BIG HELP, Reloading Australian mil .223 brass (very high quality) and of course crimped f*#ken primers.
Thanks mate.
JAP
2014-11-28 at 03:02
Im wondering do i need to swage small caliber ammo like 9mm and the like
2014-11-28 at 07:39
Hi John.
If the ammo is crimped, and some 9mm is, then yes – otherwise the new primers will not go in properly.
2015-01-21 at 11:49
Thanks for putting this info out. I have a Hornady LNL AP & there are 2 separate swage setups for it. One for 556 & then you have to buy another for 762. These products look like an after thought. They don’t make one for 9mm. That Dillon 1050B press is awesome, but maybe next time. I will probably end up with the CH4D swager.
Linked below is a slick modification for the Dillon Super Swage 600 that Dillon should adapt & call it version 2.0!
2015-01-21 at 12:44
Kevin, thanks for the input. I may acquire the LNL AP swaging setup (in .223) to try it out and add to the article.
2015-01-22 at 03:57
I ordered the CH4D kit today.
2015-01-26 at 19:04
Thank you very much. Your details to de-crimping helps me a great deal. I’m getting the Dillon Super Swage 600
2015-02-04 at 19:21
Thank you for your details on how to de-crimp military brass. It gives me alot to think about.
2015-03-01 at 18:47
I cannot believe how many people have asked in the comments what “ihui” is…..wow. Read much people? I certainly hope these same people do NOT reload.
2015-03-02 at 10:22
It’s human nature to skip to the juicy bits. At least they asked instead of staying in the dark!
2015-08-03 at 11:03
Well done Sir.
Great, easy to understand explanations.
Thanks for taking the time.
2015-10-26 at 17:58
Excellent writing!! Thank you so much for taking the time!! FYI, I made sure I read every line & therefore; I knew what ihui meant!!!! 🙂 Thanks again!
2015-10-26 at 19:17
Regarding “ihui”, my hat is off to you!
2016-04-20 at 13:49
I used the CH tool back in the early ’80s and didn’t like it for it has insurmountable technical issues. On most cases, by the time you apply enough pressure to remove the crimp, you would have most likely bent the rim enough to destroy it. Happened too many times. Got rid of it and purchased the RCBS tool that mounted in the press. Worked every time as you developed a “feel” for how far you needed to go as you NEVER set it up to “cam over” as it had too much leverage at that point. No more lost cases.
2016-06-19 at 10:51
I have used the CH tool when I was young and cheap. In many instances after you apply enough pressure to remove the crimp (even if it wasn’t enough) the rim was bent some subtly but enough to screw up chambering. I ditched that and purchased the RCBS and apart from smoothing up the swags end, works perfectly with no damaged cases. It’s true that sometimes .223 brass can slow things a bit but done once and you are done.
2016-10-10 at 15:36
Thanks for the info. I love Dillon products, but thought I might save a few bucks and go with the RCBS this time. I think I’ll stick with the Dillon Super Swage 600. You did an excellent job on this, thanks again.
2017-01-11 at 23:51
Thanks for taking the time to explain all of the different methods in so much detail with pictures. I didn’t realize there were so many ways to accomplish this basic task.
2017-06-28 at 09:00
I bought the Dillon swedger and did about 2000 and when I was finished I would say about 25% of the cases where needing to be redone again. This was after spilling powder and making a mess of my XL650. Bottom line is I called Dillon and they took me through the entire process 3 different times and the mandrel would distort the neck or the pocket. I would NOT get the Dillon, but everything else Dillon makes is great. This was just my experience. I ended up using the Hornaday swedger bit on drill press and it worked like magic.
2018-06-10 at 11:12
Good review…The main reason the military crimps primers in small arms ammunition is to prevent the primer from backing out when the ammunition is fired in a fully automatic weapon. Such a condition could cause a round to fire out of battery. For years, picking up match .45 Auto cases was a bonus, since Match grade cases did not have crimped primers. Similarly, military .38 Special cases weren’t crimped, since they were intended for use in revolvers. For some strange reason, the loading plants decided to start crimping primers in .38 cases in the late 80s. I got some and wore out a Lyman reamer preparing them. I too have a Dillon Super Swage tool. It’s first generation, and as others here relate, I had trouble with it. I noticed that the swaged pockets weren’t making it past my quality control step. After I swaged a 7.62mmm or 5.56mm case, I’d use a reamer to check the final diameter of the finished pocket. I discovered that the Dillon tool had not swaged the pocket to the bottom, and subsequently, a new primer wouldn’t be seating correctly. I ran the reamer through an entire lot of swaged cases and found that each one spit out a small, thin brass ring after the reamer had done its work. Attempting to adjust the swaging rod deeper in the case created more difficulty with operating the handle. It was easy to tell that I was exerting too much force on the handle, and that I was going to damage either the tool or the case. I settled on using the reamer as a finish step. My Dillon tool finally seized up one afternoon. The cam had galled the aluminum bearing surfaces machined into the tool body. At the time, Dillon did not recommend any lubrication of those bearing surfaces. I hope they improved it. I’ll take it to Dillon one day when I have occasion to drive to Scottsdale. The experience left me skeptical on primer pocket seating as a safe step in case preparation. Fortunately, I don’t have problems with supplies of brass any longer, so I can wait and acquire commercial cases that don’t require extra work.
2019-02-14 at 17:28
I used the RCBS tool a couple decades ago and soon gave up and just bought new brass. I haven’t swaged a primer pocket since.
2020-11-27 at 11:33
I bought the CH4D, it does not work well. It tears the rim that catches in the shell holder off before removing the swag enough to prime smoothly. Junk, I’m going to the RCBS combo 2. It clearly doesn’t pull on the extraction rim in anyway.
2022-04-24 at 13:42
Primer Pocket Crimp Removal for Small Pistol Primers
I think everybody including the manufactures’ have way over thought removing crimps. The idea of using a countersink to bevel the top edge of the primer pocket is effective at removing the crimp but the downside is the lack of control over the depth. The advantage is that beveling does significantly help to reduce or near eliminate flipped primers during priming. The ideal solution is to: 1) lightly bevel the primer pocket to remove the crimp and aid in smoother primer centering and seating 2) have depth control so no excessive material is removed and brass previously processed this way is not affected 3) the sidewall of the primer pocket other than the bevel area is not affected 4) the method is very cost effective and 5) the process is simple and fast.
This is my solution for small pistol primers only. Works best in a drill press.
1) purchase the long narrow step drill bit that ranges in size from 5/32 to 1/2
2) the only 2 sizes to be concerned with are the first two step sizes: 5/32 and 3/16.
5/32 is smaller than the primer diameter- it is the pilot and depth gauge. 3/16 step will create the bevel
3) If you can cut a 9mm case in to a cross section this will be very helpful in setting the depth. The average depth of a primer pocket is about 0.120”. If you cannot cut a cross section of a case then slightly drill out the flash hole so you can better see the bottom of the step bit when inserted.
4) The idea here is to grind the 5/32 portion of the step drill so that: 1) the face is flat so not cut the primer pocket when bottomed out and 2) to grind off just enough to get the bevel portion of the 3/16 step to just trim the face rim of the casing removing the crimp and putting a very narrow bevel on the leading edge of the primer pocket.
This is a trial and error at this stage so do not get aggressive with grinding the 5/32 portion. Trim just enough of the 5/32 at this point to get the 3/16 bevel to approach the crimped area. Chuck the bit and test on a casing. Grind a tad off and chuck again. Keep doing so until the bevel is lightly cut. Using an old primer test the how the primer inserts and grind again as necessary. There should be a narrow bevel ring at top of the primer pocket mouth much like cutting a valve seat. It should be the same width as the bevel on the step bit and NOT recessed into the casing.
Tip: If you grind this on a grinding wheel like I did you never get a totally flat face on the bit. So when fine tuning the depth, rotate the bit and find the high edge and lightly touch that against the stone to adjust the depth. This method will produce no marks in the bottom of the primer pocket.
Analyzing the situation: 10-20 minutes
Making the bit: less than 10 minutes
Processing brass: 2-3 seconds in a drill press. Press brass straight up into the bit. You can hold the brass in your hands but I prefer to wear mechanic gloves. Adjust drill press table height to make it a comfortable hand rest.
My bit is designed for 9mm brass because that is all I shoot. All small primers are essentially the same dimensions. I would not go as far as to say that all small primer shell casings have the same depth so you may have to make additional bits for other calibers. The worst case stamps with crimps I have found so far for 9mm are SAR and WIN. These guys always gave me primer issues in the past …. But no more!!! I process all my brass with this method.
Thanks and enjoy
Mike K